Logitech diNove Edge – Mac update

diNovo Lights

diNovo Lights

It seems my enthusiasm over the new Mac version of the diNovo Edge might be a bit short-lived, if the information I’ve got is correct. You see one of the cool features of the PC version of this keyboard is that with a press of the Fn key a row of soft orange lights appear just above your function keys, and the actions of those keys change to an alternate set. So for example press Fn+F3 and you can launch your email program.

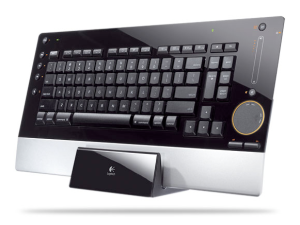
I lamented the fact that because connecting the PC version of the diNovo Edge to a Mac relies on native keyboard support, there’s no way to program those extra functions so that on the Mac the Fn key becomes nothing more than a pretty light switch. Well it seems the Mac version of the diNovo Edge has taken a different approach. On each function key there are two symbols printed – the function key number (F1, F2, etc.) and a symbol corresponding to a programmable application launcher. For example, the F5 key also has an envelope printed on it suggesting that the default alternate function for the key is to launch your mail application.

diNovo Keys (Mac)

diNovo Keys (Mac)

So why has Logitech sold Mac users short and dropped the illuminated function key options in favour of simply printing the alternate function on the key tops? Cost I guess. The Mac version of the diNovo Edge retails for slightly ($159) less than the PC version ($179), so perhaps they want to sell more of them? But at $159 it’s still a ‘premium’ keyboard so I can’t see that being the driving reason. In that case… who knows?

My thinking is now that if you’re in the market for a new keyboard for your Mac, then the diNovo Edge ‘Mac’ edition is a worthy choice, albeit not quite as cool as it’s PC cousin. If like me, you’re already using the PC version on your Mac, then I can see no compelling reason to change it for the Mac version, unless you really miss being able to adjust sensitivity levels, or have the (not nearly as cool) programmable function keys.

(Photo of Mac diNovo Edge courtesy of Engadget).

Speeding up my USB hard drive

Freecom 400Gb... meet Mac Pro

Freecom 400Gb... meet Mac Pro

As my Mac-mania gathers momentum, my Windows PCs have less and less to do. My latest change was to move a Freecom 400Gb USB drive from an XP machine across to my Mac Pro. In the looks department it’s actually a match made in heaven because both sport a brushed aluminium case and minimalist styling that I quite like. Anyway, naturally enough the drive was formatted as FAT32 from it’s days in Windows slavery and I thought why not erase it and format it with something more Mac-friendly? So, out came Disk Utility and in no time the drive was formatted as Mac OS Extended (Journaled). After all, that’s the format used on all my internal hard drives, and I didn’t think twice about it.

Next job was to populate the USB drive with my music collection (245Gb), my photos (27Gb) and my documents (1Gb). Now that says a lot about me – I’m always buying music, I take a lot of photos and I rarely write letters! Still, as I already had all this data on one of the Mac Pro’s internal drives, this USB drive was to act as a second backup location (in case Time Machine lost the plot – which is not unheard of).

I have become a great fan of ChronoSync, so this was my application of choice for copying all this data to the USB drive. Starting with my music collection, ChronoSync started copying the files and cheerily told me it would take around 2 days and 7 hours to complete the job. Wait a minute. Over TWO DAYS??! What the… My first reaction was to cancel the copy and check my settings in case I’d set some performance hungry verify option or something. No, everything seemed fine so I set ChronoSync in motion again, but the estimated time to complete was the same!

Well I knew that my Windows PCs could manage the same job in a fraction of that time so I reached for the trial version of Super Flexible File Synchronizer, just in case there was something about ChronoSync that was the problem. (I’m looking at Super Flexible’ because as a SyncBack SE user on Windows it offers a similar interface and feature set). Same outlook though, Super Flexible’ estimated the task would take days rather than hours. Surely slow file copying wasn’t a side-effect of using USB drives on Macs that I’d have to live with? I now started to recall comments I’d seen on the web about how an external USB drive can slow a Mac down and I was wondering if this was the same problem.

So it was back to square one and I fired up the OS X Disk Utility thinking I’d reformat the drive and start

Disk Utility

Disk Utility

over to see if there had been some glitch. This time round I got to thinking about what file system I’d used and whether FAT32 might be a better bet after all? Well the answer wasn’t quite that extreme. You see my initial choice of having journaling enabled was the problem. I headed on over to the Apple support site to investigate this disk format and there was my answer. Journaling offers a degree of protection against disk corruption when there’s a power-loss for example… and the price you pay is performance.

Easy then, I changed the disk format for my USB drive from Mac OS Extended (Journaled) to just Mac OS Extended. Problem solved! Without the overhead of tracking all file changes, ChronoSync now reported that the job would take a little under three hours and I was happy again.

Incidentally, I’ve been using four Freecom external USB drives (two 500Gb drives on my server and one 400Gb drive on each Windows PC) for several years. They’ve been rock solid, and the bonus is they’re silent, they look pretty stylish and they cost less than comparable drives from LaCie and Super G. You can also choose from USB 2.0, Firewire 400/800, eSata and NAS (although only the USB ones are silent).

Given the nature of external USB hard drives, once I have copied all my data across and am just doing small incremental backups I may switch the journaling back on for that extra protection. In the mean time I’m comfortable in the knowledge that when it come to disk formats, Mac OS X has got the measure of Windows.

Whatever happened to Vista’s WinFS?  Ssshhhhh….

Logitech – stop what you’re doing, I like it.

Logitech seem to be waking up to the world of the Mac, and I’m pleased. But at the same time I’m banging my head against the wall because they’re releasing Mac versions of Windows/PC products I’ve already purchased!!

Logitech QuickCam Pro 9000

Logitech QuickCam Pro 9000

It started with my Logitech QuickCam Pro 9000 – a darned fine webcam with superb resolution, autofocus, face tracking and the like. Only problem is that when you hook it up to a Mac as I have now done, you loose those ‘extra’ features and it becomes a vanilla (albeit very good) webcam. Several months down the line and Logitech have launched the Mac-specific QuickCam Vision Pro which has exactly the same spec and features as it’s Windows/PC sibling. However, the sad news is that if like me you’ve got the PC version, it’s not a case of simply installing a set of Mac drivers or doing a firmware upgrade to enable the features you’ve lost. The Mac version of the camera must be subtly different, so if you want the extra features back then the only option right now is to give your QuickCam Pro 9000 to a well deserving friend and go out and buy the Mac specific QuickCam Vision Pro.

Spot the difference!

Spot the difference!

That I could probably handle – let’s call it my birthday present to myself.

But that’s not the end of it… if you’ve read my mutterings of late, you’ll know I recently hooked up my 9 month old Logitech DiNovo Edge keyboard to my Mac, and was really pleased with the results. It’s about 80% there with just the extended function keys not working – oh and the fact that it’s a Windows keyboard with Windows specific keys. Even so I was pretty smug what with my favourite keyboard working with my favourite computer. That was until I saw today’s announcement that a Mac version of the DiNovo Edge is now available!! Yes it’s got the same gorgeous design as the earlier version, but it’s got Mac keys and it’s 100% Mac compatible, so I’d get my extended function keys back.

Logitech DiNovo Edge Mac

Logitech DiNovo Edge Mac

Is there any way for users of the Windows version to get everything working on the Mac? Well I’ve already installed the latest version of the Logitech Control Centre software for the Mac and the answer seems to be “No”. The software simply doesn’t recognize the keyboard meaning that you’re getting native keyboard support from OS X and so have no way to configure those extra keys.

Will I rush out and buy the Mac DiNovo Edge? My heart says yes, but the head says no (at the moment), because at $159 (and probably the same in £ Sterling – thankyou rip-off Britain!) it’s not a cheap purchase.

Damn you Logitech. You’re doing the right thing but you’re costing me a packet!

XBox 360 and Mac – in harmony.

I have an XBox 360 I was given a couple of years ago on my birthday. Well strictly speaking that’s not true – my first XBox 360 suffered the dreaded ‘red ring of death’ so this is a replacement. Anyway, the main thing is that as a gamer I’m hopeless, so the XBox’s main duty is as a media extender. Previously I used Windows Media Player so I could listen to my mp3’s on the stereo in the lounge via the XBox and that was pretty much it. Now that I’m using the Mac more and more, the inevitable question was “Can I hook the XBox up with the Mac”?

Absolutely you can, and my choice was Connect360 from Nullriver. Now if you’ve ever set up sharing using Windows Media Player on the PC, you’re about to find out that yet again it’s easier on the Mac. No running around typing codes from the XBox into the PC because getting Connect360 working is simplicity itself. Connect360 installs as a ‘prefpane’ meaning that you access it’s controls via System Preferences undert the ‘Other’ section.

On opening it you’re greeted with a Status page from where you can stop and start the sharing service, and see what’s being shared. Clicking the settings button will provide you with five tabs where you can change setting for general stuff, iTunes, Movies and iPhoto as well as restricting access to certain IP addresses or ranges. All nicely laid out and all very intuitive. Of course for music and photos it does require that you actually use iTunes and iPhoto, but that’s a given for so may Mac users these days. For movies you just place your movie files in your Documents/Movies folder and Connect360 shares them.

The type of movie files supported is actually down to the XBox Team and what codecs are built-in or available for the XBox (you can find a list here). I’m no expert on video codecs but I had some TV shows in .avi format and they played perfectly. Access from the XBox is also really easy, just chose the type of media you want to play, press the ‘X’ button to change the media source, then choose your Mac from the list.

Another really nice feature is the ability to redirect Internet radio to your XBox via Connect360. I listen to a variety of Internet radio stations including the Buzzoutroom, DI.FM and Soma Radio. I have all three in iTunes grouped together under a playlist called Chill Radio. All I do on the XBox is choose to play music then browse to my playlists where I can see Chill Radio. I open the playlist, pick the station I want to listen to and there I am – falling asleep on the sofa to the soothing sounds of the web.

I hadn’t even got round to showing off photos on the XBox, before I’d decided to divvy up the $20 registration fee (the only limitation around the un-registered version is the number of songs you can load up).

Back on the subject of music and iTunes, I still haven’t found the ideal replacement(s) for managing and playing music on the Mac, but for now iTunes gets the job done so it’s no real problem having it there to support stuff like Connect360. Obviously the same caveats apply when tagging your music to play on the XBox, which reminds me – I’m about due to have another look at Jaikoz as there’s a newer version out (released July 14th 2008). No rest for the wicked!

OS X and my DiNovo Edge are dancing!

Logitech

Logitech

I love it when a plan comes together, and none more so than when you get something working that you thought would be a non-starter. Enter the Logitech DiNovo Edge keyboard. I bought this keyboard back in those dark days when all I had were Windows PCs. The keyboard itself is a triumph of style and build quality and despite the fact that it looks grubby just 5 minutes after you’ve cleaned it, I wouldn’t swap it for the world.

Even so, since I bought my Mac Pro back in February this year, I have had the DiNovo Edge and my MX Revolution mouse plugged into one of the Windows PCs, and have been using Synergy to then share them to my Mac. Today that all changed. I finally took the plunge and decided to plug my Logitech peripherals directly into the Mac and run Synergy ‘server’ there to share them back to my Windows and Linux machines. It took a little tweaking to get the DiNovo keyboard working under OS X, so to save you the trouble I have listed the steps you need to follow below…

1. Go to the Logitech website and download the Logitech Control Centre software for Mac OS X. As at the time of writing, this is on version 2.6.

2. Install the software (even though Logitech don’t officially support the DiNovo Edge under Mac OS X).

3. Now you have 2 choices as to how to connect your keyboard to your Mac. You can either use the supplied Logitech Bluetooth receiver, or the Mac’s built-in Bluetooth if your model has one.

4. If using your Mac’s built-in Bluetooth, make sure it is on and ‘discoverable’, then follow the instructions to pair your Mac with the keyboard. If using the Logitech USB receiver you can skip this step as it’ll automatically discover the keyboard when you press the little connect button underneath.

5. Now this is the important bit for UK users unless you want your @\” symbols scrambled… Open System Preferences and choose International. Select the Input Menu button, then scroll down the list until you find Logitech U.K. Intl. Put a tick by it and also check ‘Show input menu in menu bar’. (Note – if you don’t install the Logitech Control Centre software, you won’t see this keyboard layout option). The joy is that by doing this you don’t have to muck around with key remapping software which can be pretty hairy when it doesn’t work properly (kernel panic anyone?).

6. Close System Preferences then go to the menu bar and click on the little Union Jack flag. From the menu that pops up choose Logitech U.K. Intl.

Hey presto, it works and… the key mappings should be correct. One other thing you could do if you’re a die-hard Windows user like me is to swap the Ctrl and Alt keys around so that Ctrl+C, Ctrl+V etc work as expected. Do this by opening the System Preferences again and choosing Keyboard, then clicking on the Modifier Keys button. Set the Control Key equal to Command, and vice versa.

Ok, the keyboard isn’t 100% supported on the Mac, but it’s pretty close and the following will work:

  • Holding F12 will eject the CD
  • The touch-sensitive sound slider works the Mac’s volume control
  • The mute key works
  • The touch-mouse-pad thing works
  • The sleep key (top left) brings up a prompt to Restart, Sleep, Cancel or Shutdown.
  • The Zoom In and Zoom Out buttons work.
  • The function keys all work as they should.

Unfortunately there’s no way to map the Fn+Function key assignments to applications etc. (I’ll keep

Mac Support

searching), but I’m happy it’s working as well as it does! Incidentally, I’ve also got my Logitech MX Revolution mouse connected to the Mac and the Logitech Control Centre software lets you configure the various buttons and scroll wheels as the MX is fully supported under OS X.

When I get the time, I’ll post up what I did to switch Synergy ‘server’ from the PC to the Mac, given that the Mac version doesn’t have a GUI. Ahh, the joys of being a Unix-clone…